


Interaction service
The interaction service (Aspire.Hosting.IInteractionService) allows you to prompt users for input, request confirmation, and display messages. It works in two different contexts:
- Aspire dashboard: When running
aspire runor launching the AppHost directly, interactions appear as dialogs and notifications in the dashboard UI. - Aspire CLI: When running
aspire publishoraspire deploy, interactions are prompted through the command-line interface.
This is useful for scenarios where you need to gather information from the user or provide feedback on the status of operations, regardless of how the application is being launched or deployed.
The IInteractionService API
Section titled “The IInteractionService API”The IInteractionService interface provides methods for prompting users. In C#, it’s retrieved from the dependency injection container. In TypeScript, it’s resolved from the command context’s service provider. Always check if the service is available before use — if you attempt to call a method when it’s not available, an exception is thrown. For example, the interaction service isn’t available when a command is triggered from the CLI.
var interactionService = serviceProvider.GetRequiredService<IInteractionService>();if (interactionService.IsAvailable){    var result = await interactionService.PromptConfirmationAsync(        title: "Delete confirmation",        message: "Are you sure you want to delete the data?");
if (result.Data) { // Run your resource/command logic. }}const interactionService = await context.services().getInteractionService();
if (await interactionService.isAvailable()) { const result = await interactionService.promptConfirmation( "Delete confirmation", "Are you sure you want to delete the data?", );
if (!result.canceled) { // Run your resource/command logic. }}The interaction service has several methods that you use to interact with users or display messages. The behavior of these methods depends on the execution context:
- Dashboard context (
aspire runor direct AppHost launch): Interactions appear as modal dialogs, notifications, and form inputs in the Aspire dashboard web interface. - CLI context (
aspire publishoraspire deploy): Interactions are prompted through the command-line interface with text-based prompts and responses.
The following sections describe how to use these APIs effectively in both contexts:
| Method | Description | Contexts supported |
|---|---|---|
PromptMessageBoxAsync | Displays a modal dialog box with a message and buttons for user interaction. | Dashboard only |
PromptNotificationAsync | Displays a non-modal notification in the dashboard as a message bar. | Dashboard only |
PromptConfirmationAsync | Displays a confirmation dialog with options for the user to confirm or cancel an action. | Dashboard only |
PromptInputAsync | Prompts the user for a single input value, such as text or secret. | Dashboard, CLI |
PromptInputsAsync | Prompts the user for multiple input values in a single dialog (dashboard) or sequentially (CLI). | Dashboard, CLI |
PromptProgressAsync | Displays a progress dialog with an indeterminate progress indicator during long-running operations. | Dashboard only |
Where to use the interaction service
Section titled “Where to use the interaction service”Any of the available callback-based extension methods of IResourceBuilder<T> can use the interaction service to prompt users for input or confirmation. Use the interaction service in these scenarios:
-
Custom resource types: Gather input from users or confirm actions when you create custom resource types. Resource types are free to define dashboard interactions, such as prompting for user input or displaying messages.
-
Custom resource commands: Add commands to resources in the Aspire dashboard or CLI. Use the interaction service to prompt users for input or confirmation when these commands run. When you chain a call to
WithCommandon a targetIResourceBuilder<T>, your callback can use the interaction service to gather input or confirm actions. For more information, see Custom resource commands.Commands might not be interactive when triggered from the Aspire CLI. Always check
IInteractionService.IsAvailablebefore prompting and provide a fallback path when it returnsfalse. Command arguments are the best way to collect input in commands because they work in both the dashboard and CLI. -
Publish and deploy workflows: During
aspire publishoraspire deployoperations, use the interaction service to gather deployment-specific configuration and confirm destructive operations through the CLI.
These approaches help you create interactive, user-friendly experiences for local development, dashboard interactions, and deployment workflows.
Display messages
Section titled “Display messages”There are several ways to display messages to the user:
- Dialog messages: Show important information in a dialog box.
- Notification messages: Display less critical information in a notification.
Display a dialog message box
Section titled “Display a dialog message box”Dialog messages provide important information that requires user attention.
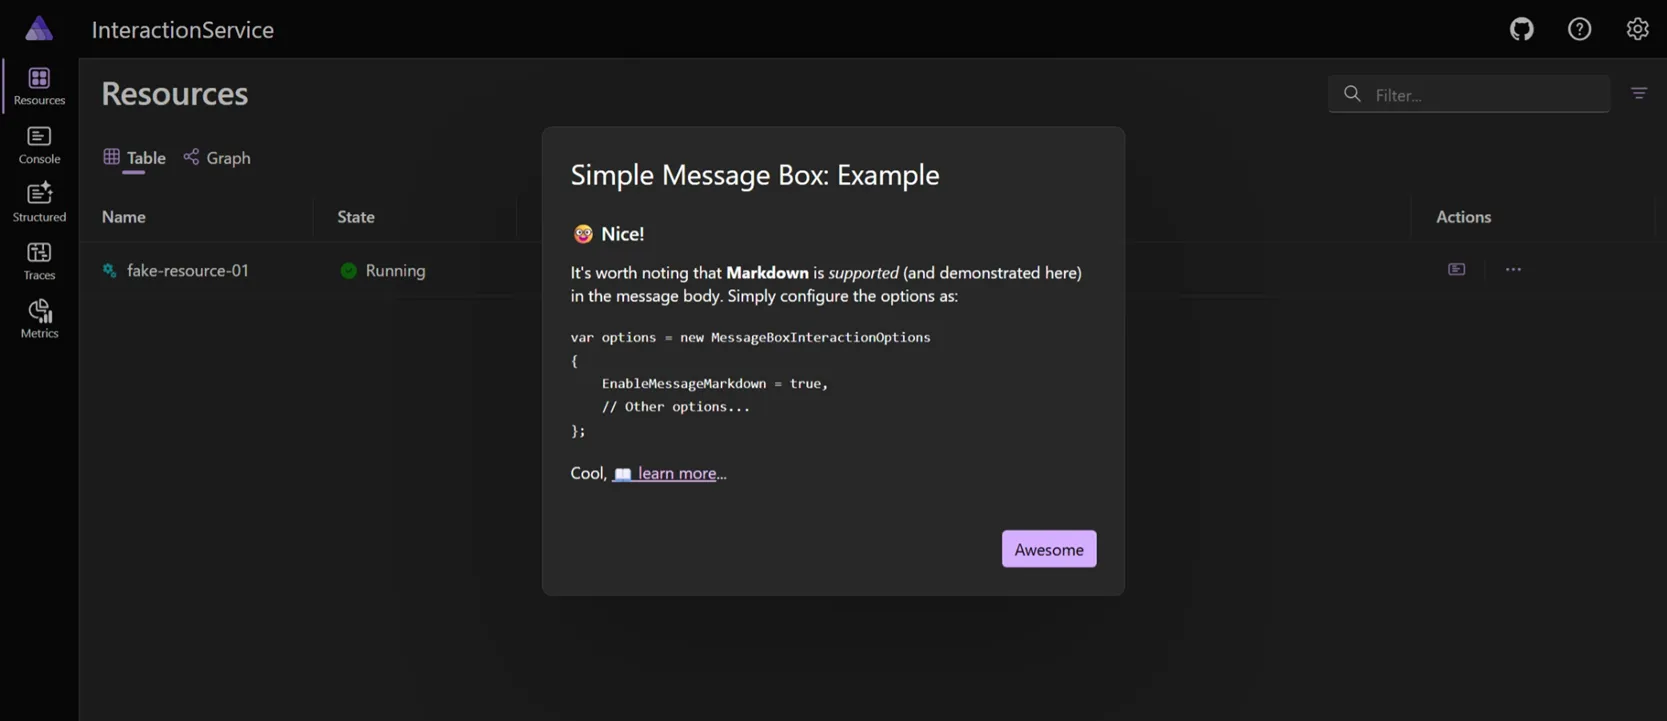
The PromptMessageBoxAsync method displays a message with customizable response options.
var interactionService = services.GetRequiredService<IInteractionService>();var result = await interactionService.PromptMessageBoxAsync(    "Apply migrations",    """    The database schema is out of date.    Would you like to apply pending migrations now?
    [Learn more about migrations](/extensibility/custom-resources/)    """,    new MessageBoxInteractionOptions    {        EnableMessageMarkdown = true,        PrimaryButtonText = "Apply",        SecondaryButtonText = "Skip",        ShowSecondaryButton = true    },    cancellationToken);
if (result.Data){ // User clicked "Apply" // Run migrations.}else{ // User either dismissed the dialog without making a choice, or clicked "Skip". // Continue without migrating.}const interactionService = await context.services().getInteractionService();
const result = await interactionService.promptMessageBox( "Apply migrations", "The database schema is out of date.\nWould you like to apply pending migrations now?", { enableMessageMarkdown: true, primaryButtonText: "Apply", secondaryButtonText: "Skip", showSecondaryButton: true, },);
if (!result.canceled) { // User clicked "Apply" // Run migrations.}Dashboard view:
CLI view:
The PromptMessageBoxAsync method only works in the dashboard context. If you call it during aspire publish or aspire deploy, the method throws an exception and doesn’t display a message in the CLI.
Display a notification message
Section titled “Display a notification message”Notification messages provide non-modal notifications.
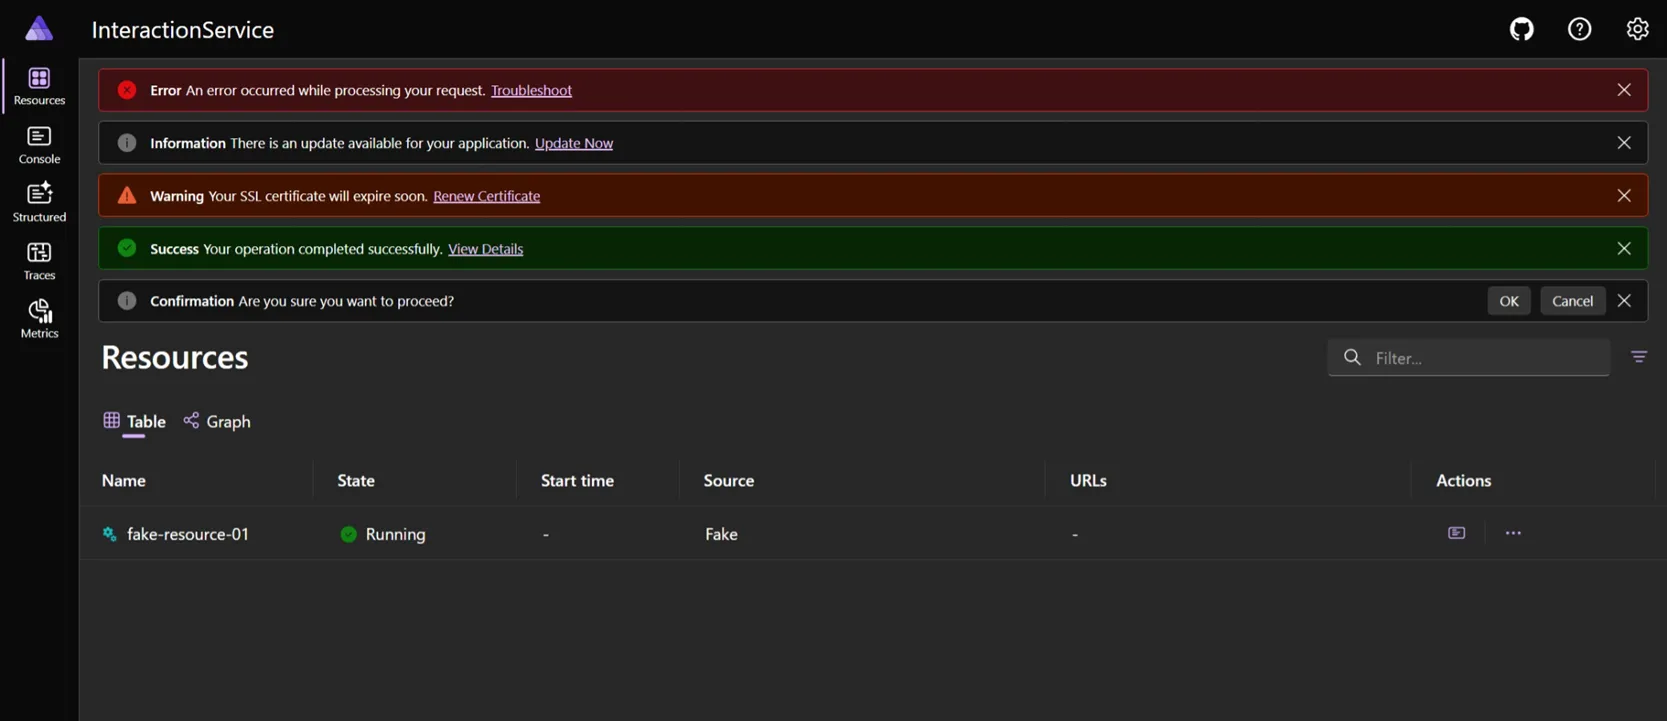
The PromptNotificationAsync method displays informational messages with optional action links in the dashboard context. You don’t have to await the result of a notification message if you don’t need to. This is especially useful for notifications, since you might want to display a notification and continue without waiting for user to dismiss it.
var interactionService = services.GetRequiredService<IInteractionService>();
await interactionService.PromptNotificationAsync(    title: "Success",    message: "Your operation completed successfully.",    options: new NotificationInteractionOptions    {        Intent = MessageIntent.Success,        LinkText = "View Details",        LinkUrl = "/"    });
await interactionService.PromptNotificationAsync( title: "Warning", message: "Your SSL certificate will expire soon.", options: new NotificationInteractionOptions { Intent = MessageIntent.Warning, LinkText = "Renew Certificate", LinkUrl = "https://portal.azure.com/certificates" });const interactionService = await context.services().getInteractionService();
await interactionService.promptNotification( "Success", "Your operation completed successfully.", { intent: MessageIntent.Success, linkText: "View Details", linkUrl: "/", },);
await interactionService.promptNotification( "Warning", "Your SSL certificate will expire soon.", { intent: MessageIntent.Warning, linkText: "Renew Certificate", linkUrl: "https://portal.azure.com/certificates", },);The previous example demonstrates how to use the notification API with different intents and optional action links.
Dashboard view:
CLI view:
The PromptNotificationAsync method isn’t available in CLI contexts. If you call it during aspire publish or aspire deploy, it throws an exception.
Prompt for user confirmation
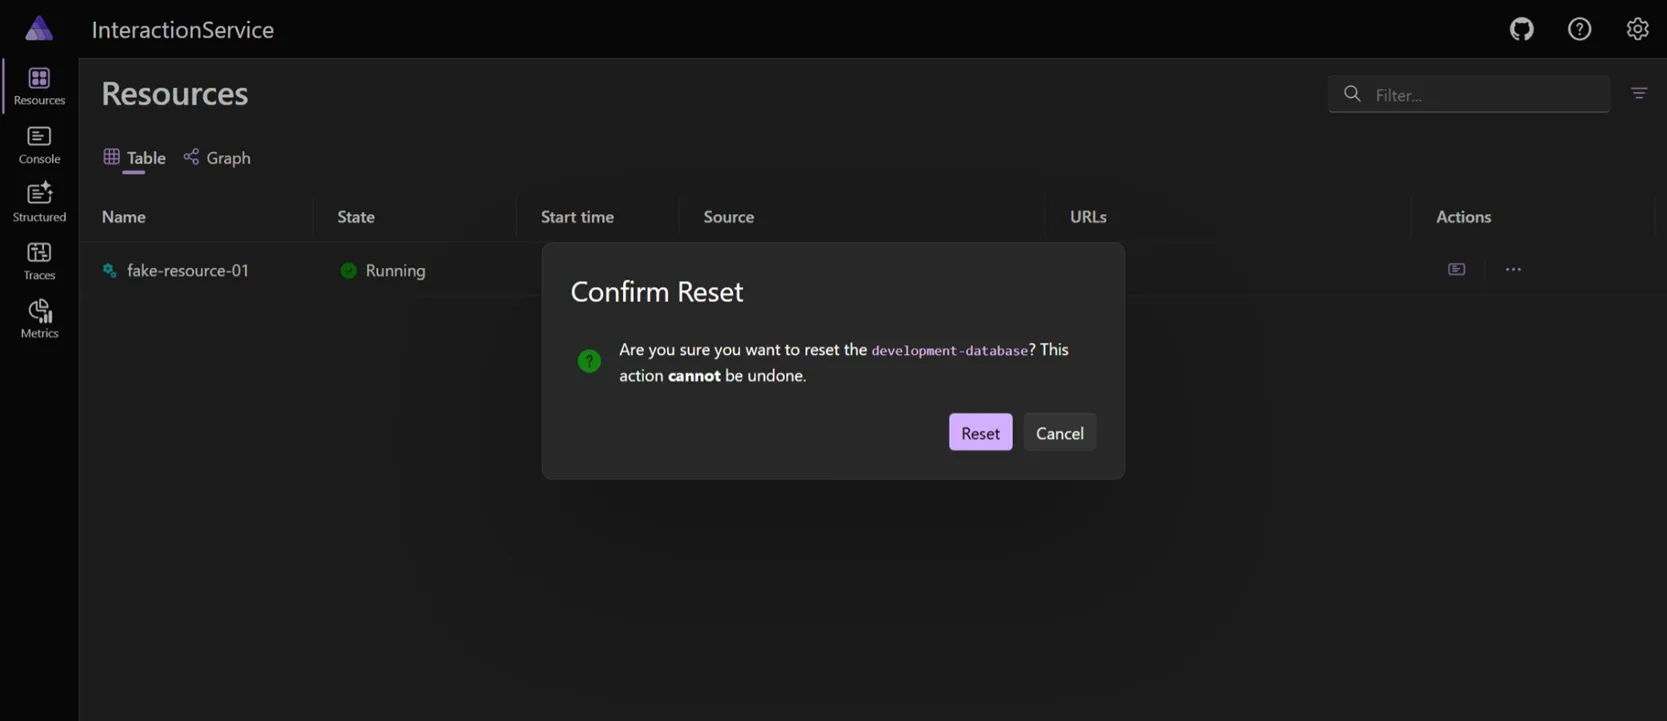
Section titled “Prompt for user confirmation”Use the interaction service when you need the user to confirm an action before proceeding. The PromptConfirmationAsync method displays a confirmation prompt in the dashboard context. Confirmation prompts are essential for destructive operations or actions that have significant consequences. They help prevent accidental actions and give users a chance to reconsider their decisions.
Prompt for confirmation before destructive operations
Section titled “Prompt for confirmation before destructive operations”For operations that can’t be undone, such as deleting resources, always prompt for confirmation:
var interactionService = services.GetRequiredService<IInteractionService>();// Prompt for confirmation before resetting databasevar resetConfirmation = await interactionService.PromptConfirmationAsync(    title: "Confirm Reset",    message: "Are you sure you want to reset the `development-database`? This action **cannot** be undone.",    options: new MessageBoxInteractionOptions    {        Intent = MessageIntent.Confirmation,        PrimaryButtonText = "Reset",        SecondaryButtonText = "Cancel",        ShowSecondaryButton = true,        EnableMessageMarkdown = true    });
if (resetConfirmation.Data){ // Perform the reset operation...}const interactionService = await context.services().getInteractionService();
const resetConfirmation = await interactionService.promptConfirmation( "Confirm Reset", "Are you sure you want to reset the database? This action cannot be undone.", { intent: MessageIntent.Confirmation, primaryButtonText: "Reset", secondaryButtonText: "Cancel", showSecondaryButton: true, enableMessageMarkdown: true, },);
if (!resetConfirmation.canceled) { // Perform the reset operation...}Dashboard view:
CLI view:
The PromptConfirmationAsync method isn’t available in CLI contexts. If you call it during aspire publish or aspire deploy, the method throws an exception.
Prompt for user input
Section titled “Prompt for user input”The interaction service API allows you to prompt users for input in various ways. You can collect single values or multiple values, with support for different input types including text, secrets, choices, booleans, numbers, and files. The presentation adapts automatically to the execution context.
| Type | Dashboard | CLI prompt |
|---|---|---|
Text | Textbox | Text prompt |
SecretText | Textbox with masked input | Masked text prompt |
Choice | Dropdown box of options | Choice prompt |
Boolean | Checkbox | Boolean choice prompt |
Number | Number textbox | Text prompt |
File | File picker dialog | File path prompt |
Each InteractionInput has a Name and a Label property:
Labelis the user-facing text displayed in the dashboard or CLI prompt.Nameis a programmatic identifier used to access the input’s value from the result collection (for example,result.Data["MyInputName"].Value).
Prompt the user for input values
Section titled “Prompt the user for input values”You can prompt for a single value using the PromptInputAsync method, or collect multiple pieces of information with PromptInputsAsync. In the dashboard, multiple inputs appear together in a single dialog. In the CLI, each input is requested one after another.
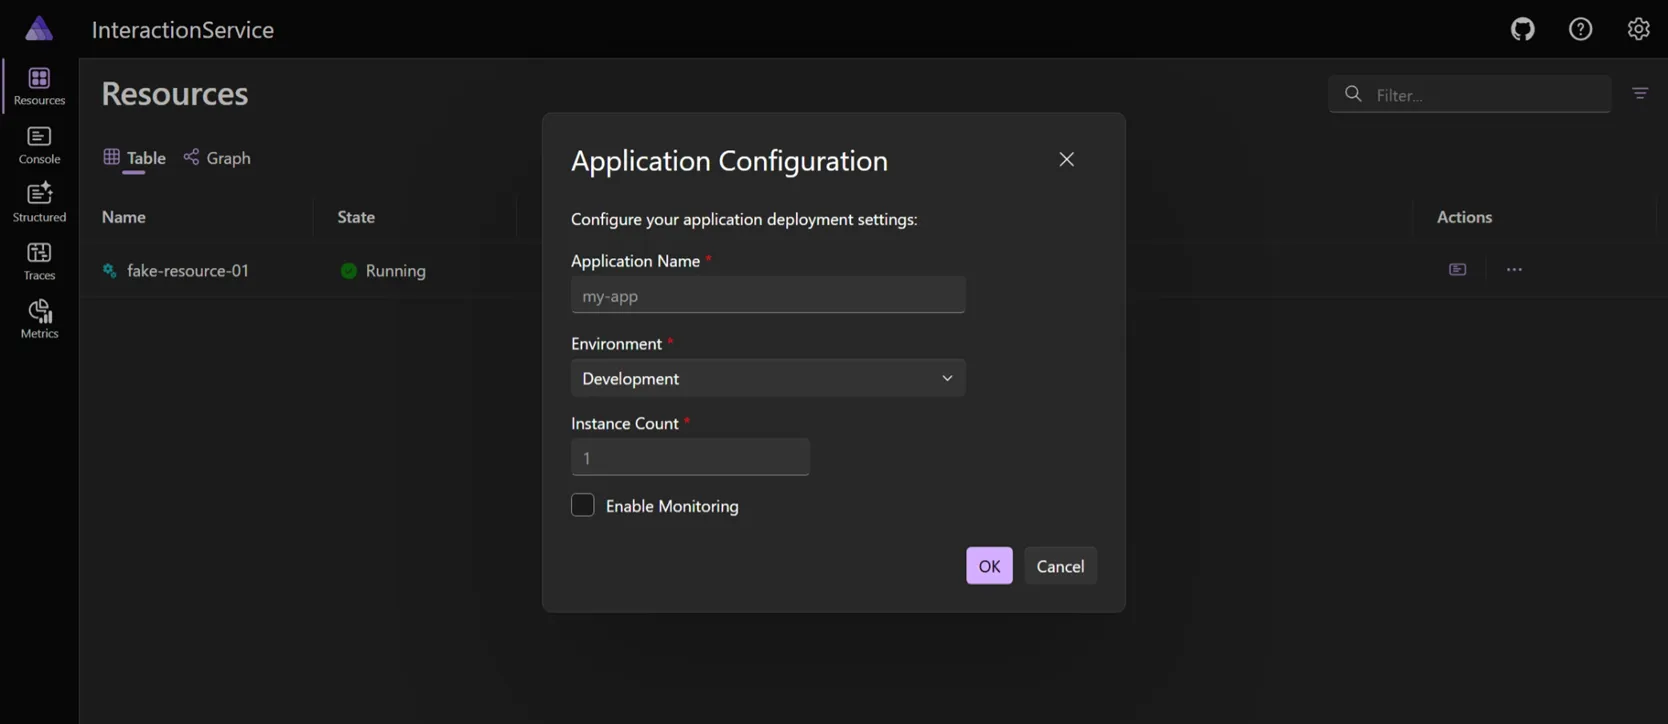
Consider the following example, which prompts the user for multiple input values:
var interactionService = services.GetRequiredService<IInteractionService>();var loggerService = services.GetRequiredService<ResourceLoggerService>();var logger = loggerService.GetLogger(fakeResource);
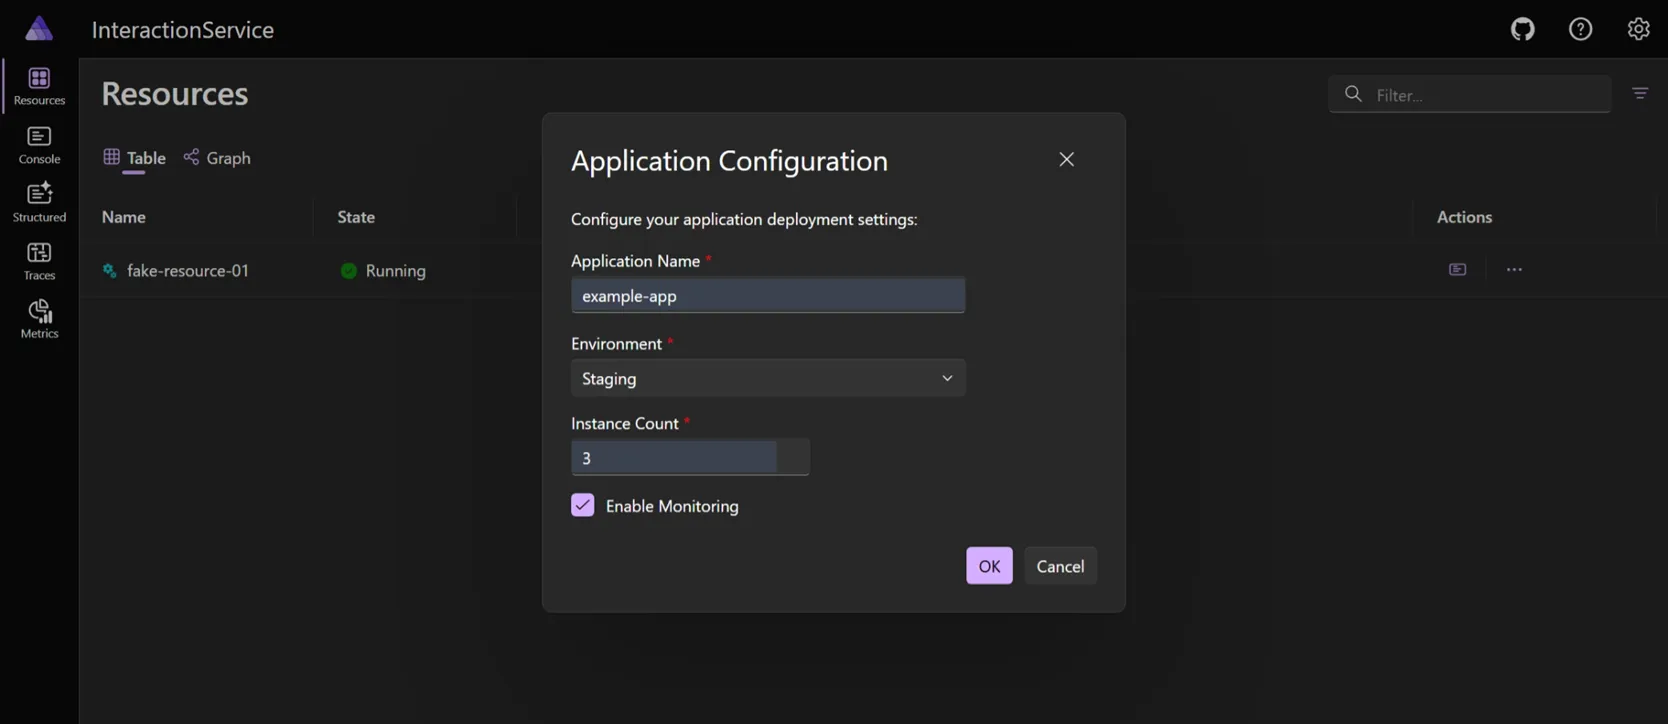
var inputs = new List<InteractionInput>{    new()    {        Name = "AppName",        Label = "Application Name",        InputType = InputType.Text,        Required = true,        Placeholder = "my-app"    },    new()    {        Name = "Environment",        Label = "Environment",        InputType = InputType.Choice,        Required = true,        Options =        [            new("dev", "Development"),            new("staging", "Staging"),            new("test", "Testing")        ]    },    new()    {        Name = "InstanceCount",        Label = "Instance Count",        InputType = InputType.Number,        Required = true,        Placeholder = "1"    },    new()    {        Name = "EnableMonitoring",        Label = "Enable Monitoring",        InputType = InputType.Boolean,        Required = false    }};
var appConfigurationInput = await interactionService.PromptInputsAsync(    title: "Application Configuration",    message: "Configure your application deployment settings:",    inputs: inputs);
if (!appConfigurationInput.Canceled){    // Process the collected input values    var appName = appConfigurationInput.Data["AppName"].Value;    var environment = appConfigurationInput.Data["Environment"].Value;    var instanceCount = int.Parse(appConfigurationInput.Data["InstanceCount"].Value ?? "1");    var enableMonitoring = bool.Parse(appConfigurationInput.Data["EnableMonitoring"].Value ?? "false");
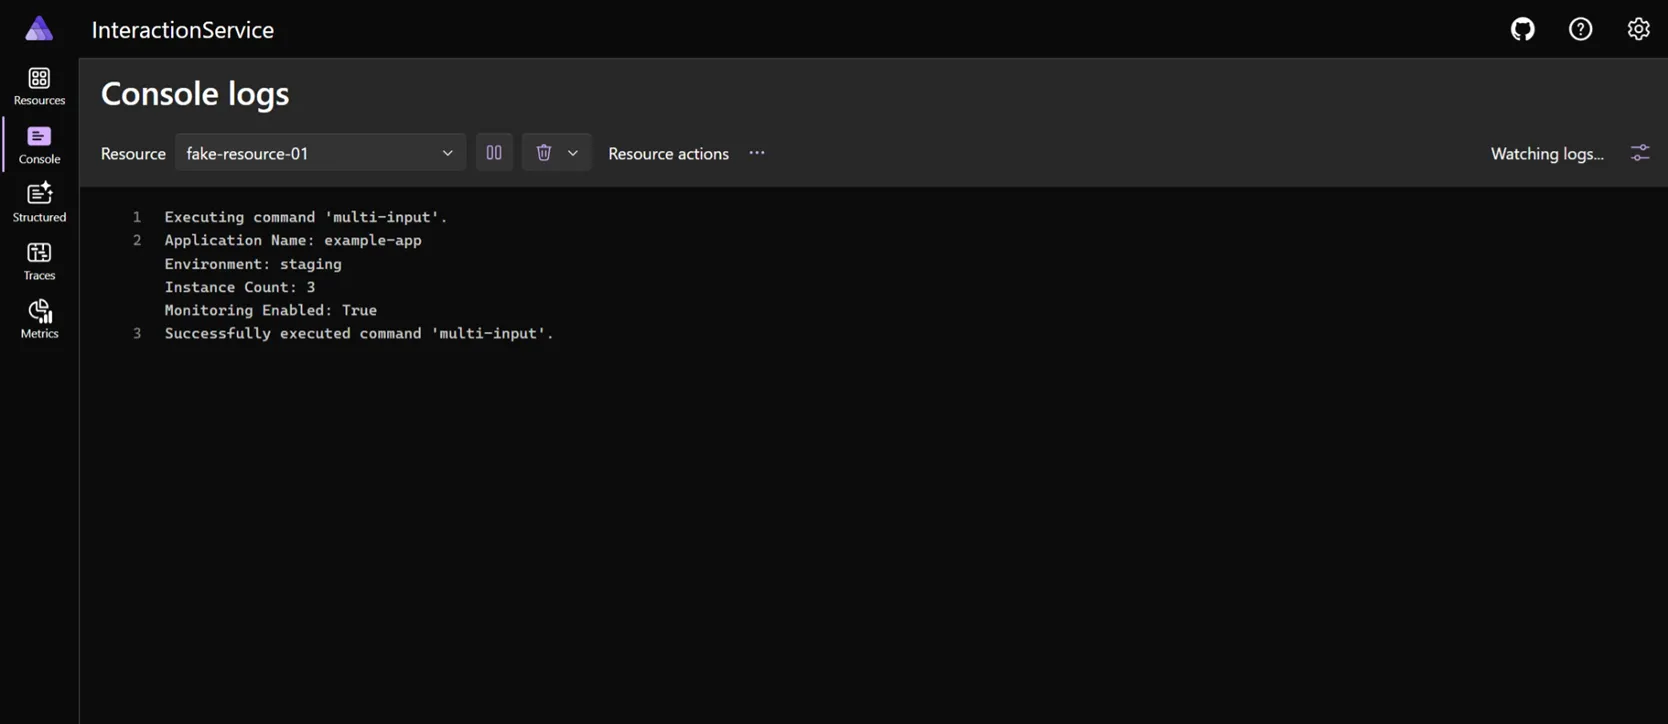
    logger.LogInformation("""        Application Name: {AppName}        Environment: {Environment}        Instance Count: {InstanceCount}        Monitoring Enabled: {EnableMonitoring}        """,        appName, environment, instanceCount, enableMonitoring);
// Use the collected values as needed}const interactionService = await context.services().getInteractionService();
const appName = await interactionService.createTextInput("AppName", { label: "Application Name", required: true, placeholder: "my-app",});
const environment = await interactionService.createChoiceInput( "Environment", { choices: [ { value: "dev", label: "Development" }, { value: "staging", label: "Staging" }, { value: "test", label: "Testing" }, ], options: { required: true }, },);
const instanceCount = await interactionService.createNumberInput( "InstanceCount", { label: "Instance Count", required: true, placeholder: "1", },);
const enableMonitoring = await interactionService.createBooleanInput( "EnableMonitoring", { label: "Enable Monitoring" },);
const result = await interactionService.promptInputs( "Application Configuration", "Configure your application deployment settings:", [appName, environment, instanceCount, enableMonitoring],);
if (!(await result.canceled())) { const name = await result.inputs().value("AppName"); const env = await result.inputs().value("Environment"); const count = await result.inputs().value("InstanceCount"); const monitoring = await result.inputs().value("EnableMonitoring");
// Use the collected values as needed}Dashboard view:
This renders on the dashboard as shown in the following image:
Imagine you fill out the dialog with the following values:
After you select the Ok button, the resource logs display the following output:
CLI view:
In the CLI context, the same inputs are requested sequentially:
aspire deploy
Step 1: Analyzing model.
       ✓ DONE: Analyzing the distributed application model for publishing and deployment capabilities. 00:00:00       Found 1 resources that support deployment. (FakeResource)
✅ COMPLETED: Analyzing model. completed successfully
══════════════════════════════════════════════════════════════════════════════════════════════════════════════Configure your application deployment settings:Application Name: example-appEnvironment:  StagingInstance Count: 3Enable Monitoring: [y/n] (n): y✓ DEPLOY COMPLETED: Deploying completed successfully
Depending on the input type, the CLI might display additional prompts. For example, the Enable Monitoring input is a boolean choice, so the CLI prompts for a yes/no response. If you enter y, it enables monitoring; if you enter n, it disables monitoring. For the environment input, the CLI displays a list of available environments for selection:
Configure your application deployment settings:Application Name: example-appEnvironment:
> Development  Staging  Testing
(Type to search)
Load input options dynamically
Section titled “Load input options dynamically”The interaction service supports dynamic inputs so you can populate options based on earlier responses. This enables cascading dropdowns and other dependent prompts in both the dashboard and CLI experiences.
To configure a dynamic input, set the InteractionInput.DynamicLoading property to an instance of InputLoadOptions. InputLoadOptions has a range of properties:
- LoadCallback: A callback function that populates or refreshes the input options. This function is invoked when the input needs to be loaded or refreshed. You can access the current values of other inputs through the
context.AllInputsdictionary. - DependsOnInputs: A list of input names that the dynamic input depends on. When any of these inputs change, the
LoadCallbackis triggered to refresh the options for the dynamic input. If no dependencies are specified then the callback is triggered when the interaction starts. - AlwaysLoadOnStart: If set to
true, theLoadCallbackis always called when the interaction starts, even if the dynamic input has dependencies.
var inputs = new List<InteractionInput>{    new()    {        Name = "DatabaseType",        InputType = InputType.Choice,        Label = "Database Type",        Required = true,        Options =        [            KeyValuePair.Create("postgres", "PostgreSQL"),            KeyValuePair.Create("mysql", "MySQL"),            KeyValuePair.Create("sqlserver", "SQL Server")        ]    },
    new()    {        Name = "DatabaseVersion",        InputType = InputType.Choice,        Label = "Database Version",        Required = true,        DynamicLoading = new InputLoadOptions        {            LoadCallback = async context =>            {                var dbType = context.AllInputs["DatabaseType"].Value;                context.Input.Options = await GetAvailableVersionsAsync(dbType);            },            DependsOnInputs = ["DatabaseType"]        }    }};
var result = await interactionService.PromptInputsAsync(    title: "Database configuration",    message: "Select a database type and version",    inputs: inputs);
if (!result.Canceled){    var version = result.Data["DatabaseVersion"].Value;    // Use version-specific configuration...}
Use withDynamicLoading to populate options based on other inputs. The callback runs server-side, receives a loadContext, and updates the loading input through loadContext.input():
const interactionService =    await context.services().getInteractionService();
const dbType = await interactionService.createChoiceInput("DatabaseType", {    label: "Database Type",    choices: [        { value: "postgres", label: "PostgreSQL" },        { value: "mysql", label: "MySQL" },        { value: "sqlserver", label: "SQL Server" },    ],    options: { required: true },});
const dbVersion = await (    await interactionService.createChoiceInput("DatabaseVersion", {        label: "Database Version",        options: { required: true },    })).withDynamicLoading(    async (loadContext) => {        const selectedType = await loadContext.inputs().value("DatabaseType");        const versions = await getAvailableVersions(selectedType);        await loadContext.input().setChoiceOptions(versions);    },    { dependsOnInputs: ["DatabaseType"] },);
const result = await interactionService.promptInputs(    "Database configuration",    "Select a database type and version",    [dbType, dbVersion],);
if (!(await result.canceled())) {    const version = await result.inputs().value("DatabaseVersion");    // Use version-specific configuration...}
In the preceding example, the database version input is dynamically populated based on the selected database type.
Input validation
Section titled “Input validation”Basic input validation is available by configuring inputs with Required and MaxLength properties. For complex scenarios, you can provide a custom validation callback that runs server-side when the user submits the dialog.
Use the InputsDialogInteractionOptions.ValidationCallback property:
// Multiple inputs with custom validationvar databaseInputs = new List<InteractionInput>{    new()    {        Name = "DatabaseName",        Label = "Database Name",        InputType = InputType.Text,        Required = true,        Placeholder = "myapp-db"    },    new()    {        Name = "Username",        Label = "Username",        InputType = InputType.Text,        Required = true,        Placeholder = "admin"    },    new()    {        Name = "Password",        Label = "Password",        InputType = InputType.SecretText,        Required = true,        Placeholder = "Enter a strong password"    },    new()    {        Name = "ConfirmPassword",        Label = "Confirm password",        InputType = InputType.SecretText,        Required = true,        Placeholder = "Confirm your password"    }};
var validationOptions = new InputsDialogInteractionOptions{    ValidationCallback = async context =>    {        var passwordInput = context.Inputs["Password"];        var confirmPasswordInput = context.Inputs["ConfirmPassword"];
        // Validate password strength        if (passwordInput.Value is { Length: < 8 })        {            context.AddValidationError(passwordInput, "Password must be at least 8 characters long");        }
        // Validate password confirmation        if (passwordInput.Value != confirmPasswordInput.Value)        {            context.AddValidationError(confirmPasswordInput, "Passwords do not match");        }
        await Task.CompletedTask;    }};
var dbResult = await interactionService.PromptInputsAsync(    title: "Database configuration",    message: "Configure your PostgreSQL database connection:",    inputs: databaseInputs,    options: validationOptions);
if (!dbResult.Canceled && dbResult.Data != null){    // Use the validated configuration}
Supply a validationCallback on the options object. The callback reads submitted values through validationContext.inputs().value(name) and registers per-field errors through validationContext.addValidationError(field, message):
const interactionService =    await context.services().getInteractionService();
const password = await interactionService.createSecretInput("password", {    label: "Password",    required: true,    placeholder: "Enter a strong password",});
const confirmPassword = await interactionService.createSecretInput(    "confirmPassword",    {        label: "Confirm password",        required: true,        placeholder: "Confirm your password",    },);
const result = await interactionService.promptInputs(    "Database configuration",    "Configure your PostgreSQL database connection:",    [password, confirmPassword],    {        validationCallback: async (validationContext) => {            const pw = await validationContext.inputs().value("password");            const cpw = await validationContext                .inputs()                .value("confirmPassword");
            if (pw && pw.length < 8) {                await validationContext.addValidationError(                    "password",                    "Password must be at least 8 characters long",                );            }            if (pw !== cpw) {                await validationContext.addValidationError(                    "confirmPassword",                    "Passwords do not match",                );            }        },    },);
if (!(await result.canceled())) {    // Use the validated configuration}
Prompting the user for a password and confirming they match is referred to as “dual independent verification” input. This approach is common in scenarios where you want to ensure the user enters the same password twice to avoid typos or mismatches.
Prompt for file upload
Section titled “Prompt for file upload”The File input type enables users to select and upload files through the native OS/browser file picker in the dashboard, or by providing a file path in the CLI. Files are uploaded to the AppHost and stored on disk, with metadata available through the InteractionFile class.
var interactionService = services.GetRequiredService<IInteractionService>();
var fileInput = new InteractionInput{    Name = "ConfigFile",    InputType = InputType.File,    Label = "Configuration file",    Placeholder = "Select a file to import",    Required = true,    FileFilter = ".json,.yaml,.yml",    MaxFileSize = 10 * 1024 * 1024 // 10 MB};
var result = await interactionService.PromptInputAsync(    "Import configuration",    "Select a configuration file to import.",    fileInput,    cancellationToken: cancellationToken);
if (result.Canceled){    return CommandResults.Failure("Canceled");}
var file = result.Data.Files?[0];if (file is null){    return CommandResults.Failure("No file uploaded");}
// Read all file content as bytesvar content = await file.ReadAllBytesAsync(cancellationToken);
// Or open as a stream for large filesawait using var stream = file.OpenRead();const interactionService = await context.services().getInteractionService();
const fileInput = await interactionService.createFileInput("ConfigFile", { label: "Configuration file", description: "Select a file to import", required: true, maxFileSize: 10 * 1024 * 1024, // 10 MB});
const result = await interactionService.promptInput( "Import configuration", "Select a configuration file to import.", fileInput, { primaryButtonText: "Upload" },);
if (result.canceled) { return { success: false, message: "Canceled" };}
const files = result.input?.files ?? [];if (files.length === 0) { return { success: false, message: "No file uploaded" };}
const file = files[0];// file.name - original filename// file.filePath - path to uploaded file on diskThe InteractionInput for file uploads supports these additional properties:
FileFilter: Restricts selectable files using the same format as the HTMLacceptattribute (for example,".pem,.pfx,.crt"or"image/*").MaxFileSize: Maximum file size in bytes. Files exceeding this limit are rejected with a validation error.AllowMultipleFiles: Whentrue, the user can select more than one file.
Best practices for user input
Section titled “Best practices for user input”When prompting for user input, consider these best practices:
- Group related inputs: Use multiple input prompts to collect related configuration values. In the dashboard, these appear in a single dialog; in the CLI, they’re requested sequentially but grouped conceptually.
- Provide clear labels and placeholders: Help users understand what information is expected, regardless of context.
- Use appropriate input types: Choose the right input type for the data you’re collecting (secret for passwords, choice for predefined options, etc.). Both contexts support these input types appropriately.
- Implement validation: Validate user input and provide clear error messages when validation fails. Both contexts support validation feedback.
- Make required fields clear: Mark required fields and provide appropriate defaults for optional ones.
- Handle cancellation: Always check if the user canceled the input prompt and handle it gracefully. Users can cancel in both dashboard and CLI contexts.
Display progress
Section titled “Display progress”The interaction service can display a progress dialog during long-running operations. The progress dialog shows an indeterminate progress indicator with an optional title, message, and cancel button. This is useful for scenarios such as resource deployment, data processing, or Azure provisioning where the user should wait for an operation to complete.
Display progress with a work callback
Section titled “Display progress with a work callback”The simplest approach is to provide a Work callback via ProgressInteractionOptions. The progress dialog opens when PromptProgressAsync is called and closes automatically when the callback completes:
#pragma warning disable ASPIREINTERACTION001
var interactionService = services.GetRequiredService<IInteractionService>();var result = await interactionService.PromptProgressAsync(    "Please wait while resources are being downloaded...",    "Downloading resources",    new ProgressInteractionOptions    {        PrimaryButtonText = "Cancel",        Work = async progress =>        {            await DownloadResourcesAsync(progress.CancellationToken);        }    },    cancellationToken);
if (result.Canceled){ // User clicked the cancel button.}const interactionService = await context.services().getInteractionService();
const result = await interactionService.promptProgress( "Please wait while resources are being downloaded...", { title: "Downloading resources", options: { primaryButtonText: "Cancel", work: async () => { await downloadResources(); }, }, },);
if (result.canceled) { // User clicked the cancel button.}When a Work callback is provided:
- The dialog stays open while the callback runs.
- If a cancel button is shown (via
PrimaryButtonText), clicking it triggersProgressContext.CancellationToken, which you can observe inside the callback. - The method returns an
InteractionResult<bool>withCanceled = trueif the user clicked cancel.
Display progress without a work callback
Section titled “Display progress without a work callback”If you don’t provide a Work callback, the progress dialog stays open until the cancellationToken passed to PromptProgressAsync is canceled, or the user clicks the cancel button (if PrimaryButtonText is set). This pattern is useful when you manage the work yourself and want to close the dialog at a specific point:
#pragma warning disable ASPIREINTERACTION001
var interactionService = services.GetRequiredService<IInteractionService>();using var cts = CancellationTokenSource.CreateLinkedTokenSource(cancellationToken);
var progressTask = interactionService.PromptProgressAsync(    "Processing data...",    "Processing",    cancellationToken: cts.Token);
// Do work, then close the dialog by canceling the token.await DoWorkAsync(cancellationToken);cts.Cancel();
await progressTask;
Because no PrimaryButtonText is set, the dialog has no cancel button and the user cannot dismiss it.
Interaction contexts
Section titled “Interaction contexts”The interaction service behaves differently depending on how your Aspire solution is launched:
Dashboard context
Section titled “Dashboard context”When you run your application using aspire run or by directly launching the AppHost project, interactions appear in the Aspire dashboard web interface:
- Modal dialogs: Message boxes and input prompts appear as overlay dialogs that require user interaction.
- Notification messages: Informational messages appear as dismissible banners at the top of the dashboard.
- Progress dialogs: Long-running operations display a non-dismissable progress indicator with an optional cancel button.
- Rich UI: Full support for interactive form elements, validation, and visual feedback.
- All methods available: All interaction service methods are supported in dashboard contexts.
CLI context
Section titled “CLI context”When you run aspire publish or aspire deploy, interactions are prompted through the command-line interface:
- Text prompts: Only input prompts (
PromptInputAsyncandPromptInputsAsync) are available and appear as text-based prompts in the terminal. - Sequential input: Multiple inputs are requested one at a time rather than in a single dialog.
- Limited functionality: Message boxes, notifications, confirmation dialogs, and progress dialogs aren’t available and throw exceptions if called.
See also
Section titled “See also”- Custom resource commands — Add commands with arguments to resources in the dashboard and CLI
- AppHost eventing — Subscribe to resource lifecycle events
- Custom resources — Build custom resource types for the AppHost